


Shabby Chic Rag Quilt Tutorial

This project can be completely put together in one day (if you have all day to work on it). It is THAT simple!
I used an 8 1/2 inch square rotary ruler, rotary cutter & rotary mat, 2 yards yellow toile, 2 yards blue toile, 1 yellow twin size sheet & 1 old light blue flannel twin size sheet. I will link to supplies below (click on items).
8.5 inch Rotary Ruler

If you plan on sewing much at all, the rotary cutter and mat are soooooo helpful!
Rotary cutter $8.51

This is a good size mat (not too big, not too small) $13.50


I decided to use 2 colors and do a kind of checkerboard effect. It also makes it much easier & less confusing to lay out. You also do not have to use sheets. I picked up that yellow (Ralph Lauren) sheet for this purpose because I wanted a really soft back on my quilt. That blue flannel sheet is actually an old sheet. I use flannel as my filler because I wanted something lightweight that would still be warm in my quilt. (I even have a stash of old flannel pjs that I am going to be using for another quilt!) If you use sheets, make sure they are smooth before you cut them. You want your squares to be as even as possible and wrinkled fabric prevents that.
I have also made rag quilts with batting instead of flannel an they are a little puffier & cute, just not quite as quick & easy – so this is my preferred method.
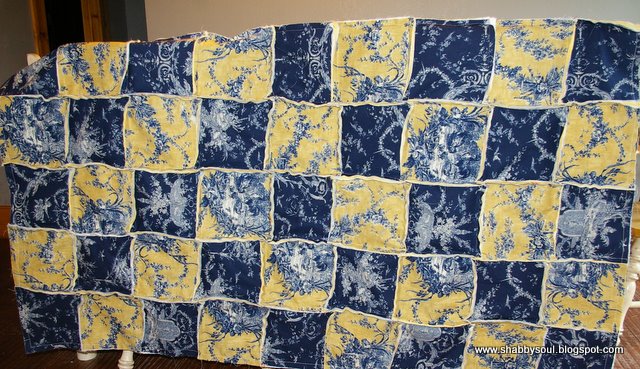
On to my tutorial:I made this quilt 6 squares wide by 9 squares long. This way it will cover my tall man’s toes when he uses it.

Cut 54 (8 1/2 inch) squares from your backing fabric & your flannel.
Cut 27 (8 1/2 inch) squares of each of your two fabrics for the front.

Now that you have all of your squares cut, it is time to make the fabric sandwiches.


Whats not to love?? Those cute little sumos guarding my pins.

Use ALL of the squares to make fabric sandwiches.
Put backing fabric on the bottom, flannel, on the inside, and print fabric on top.

I actually had to go back and iron all of my squares I made from sheets (after I took this pic) because they were wrinkled and my squares didn’t cut evenly.

Now that you have your two stacks, you divide them into 6 rows of nine squares (1 yellow, 1 blue, 1 yellow, 1 blue, etc.)
These will be your blanket rows.

You have all of your squares divided into rows, so now it is time to sew them together!
You are half way through!

Get your first stack & put them neatly backsides together.

Sew them using a 1/2 inch seam allowance. It looks a little weird with all the seams poking up, but they will be precious at the end!

Grab the next square and sew it to the bottom in the same way. Continue until you finish the row.
Be careful not to sew it front sides together. I have done this at least once on each rag quilt I have made. If it happens just get your seam ripper out and fix it – and then just pretend it never happened!

After your first row is finished, set it aside and repeat for the remaining 5 sets of squares.

Yay for you!
Now, that you have all 6 vertical rows sewn together, it is time to sew the rows together!

Put the rows together longways- with backs together – and sew together with a 1/2 inch seam.
The easiest way to do it, is to sew three rows together, then set them aside. Then sew the other three rows together the same way.

Then sew the 2 sets together. It is just easier to handle that way.
O.K. Girlies! Now that you have all of your rows sewn together, your sewing is almost finished!

You need to sew a 1/2 seam all around the outside edge of the entire blanket.
I double stitched (went around it twice) this one because I used decorator fabric and wanted it to be extra secure.

Whoila! Your quilt is all sewn together! All that’s left is to snip all of the seams!
Go down every raised seam & around the edge snipping about every 1/4 – 1/2 inch – making sure not to snip the stitch!
Be careful because it is a pain to find holes after it is washed – but, if it happens you just have to restitch those places. I used to get REALLY close to the stitch, now I stay back a bit )as in the picture below. Another note about snipping – regular scissors will work, but spring loaded scissors are recommended. That is ALOT of snipping – your hands will thank you for spring loaded scissors. The scissors below are the 2 kinds that I have and highly recommend! The Fiskars ones are on sale right now for $8.39! Great price! Click either pair to purchase on Amazon

These are a bit pricier but also work very well and are a bit more sturdy.

Here is my uwashed quilt!
After washing, the upturned edges start to fray & look adorable. I bring them to the laundry mat because the lint it throws off is CRAZY! Commercial washers/dryers are designed to handle more lint than home machines. I have heard it can tear up your machine.
You can also stop the wash half way through and get all the lint out then & then shake the quilt out and finish the cycle.


This is the buttery soft backside of my quilt.
I recommend that you keep it simple if this is your first quilt!
I would love to see pictures if ya’ll make one!
I will be happy to answer any questions you might have!


